Embed Booking Widget (WordPress/Wix/Squarespace)
Quick path: Settings → eCommerce → Copy embed code → Paste on your site
What this helps you do
Section titled “What this helps you do”The Bloowatch booking widget is an iframe-based catalog you embed on any web page. Once embedded, visitors see your activities, available sessions, prices, and a full checkout flow with online payment. Bookings land straight in your Sales dashboard.
This article covers how to get the embed code, paste it into WordPress, Wix, or Squarespace, make it responsive, and troubleshoot the most common issues (blank widget, cross-origin errors, broken layout on mobile).
Before you start
Section titled “Before you start”- You’re on a PRO or GOLD plan (online booking is not available on START)
- Online booking is enabled and at least one product is visible in the widget (see Set Up Online Booking)
- You have editor access to your website (WordPress admin, Wix Editor, or Squarespace dashboard)
1. Get the embed code from Settings > eCommerce
Section titled “1. Get the embed code from Settings > eCommerce”Open the Bloowatch back-office. Click the gear icon in the left sidebar, then click ECOMMERCE. The page displays the HTML embed code for your booking widget.
Click COPY THE CODE to copy the snippet to your clipboard.
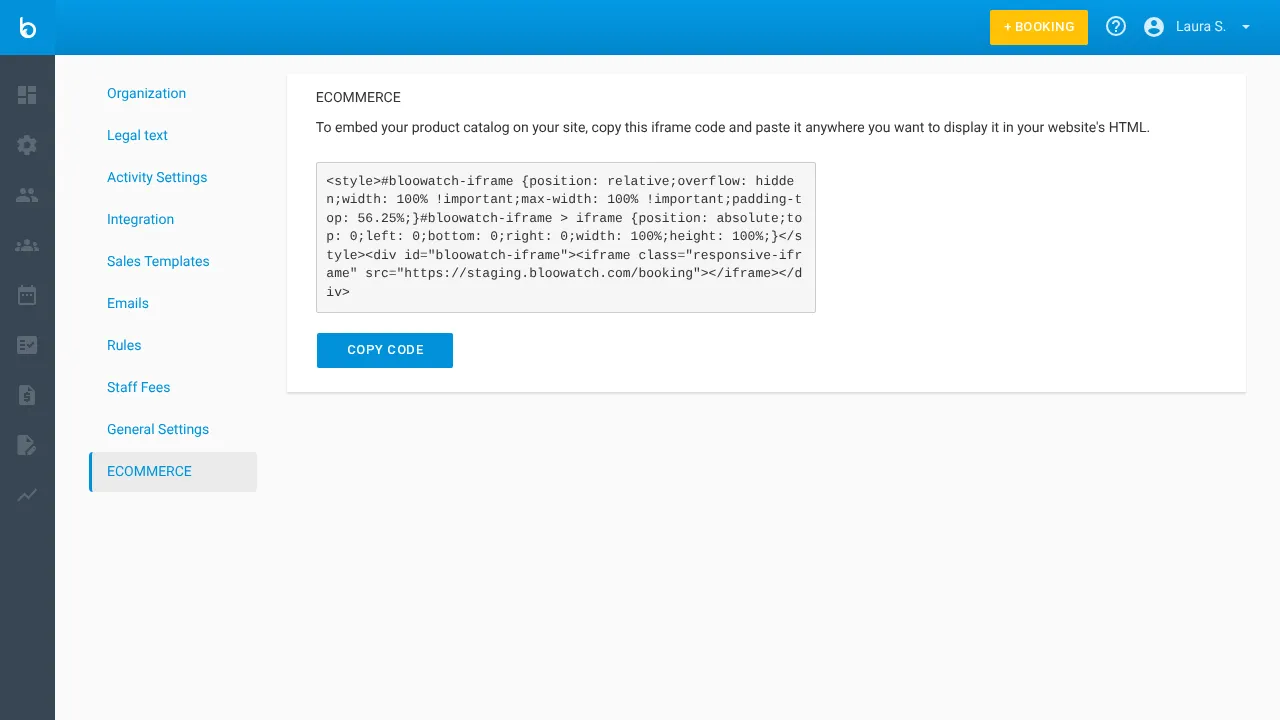
The code looks like this:
<style> .bloowatch-booking-wrapper { position: relative; overflow: hidden; width: 100%; padding-top: 56.25%; } .bloowatch-booking-wrapper iframe { position: absolute; top: 0; left: 0; width: 100%; height: 100%; border: 0; }</style><div class="bloowatch-booking-wrapper"> <iframe src="https://your-school.bloowatch.com/booking" allowfullscreen></iframe></div>2. Preview the widget before embedding
Section titled “2. Preview the widget before embedding”Open your booking URL directly in a browser (e.g., https://your-school.bloowatch.com/booking) to confirm it loads correctly. You should see:
- Your school name and logo
- Category tabs matching your product categories
- Product cards with image, name, price, and a BOOK button

Tip: If the widget is blank, check that at least one product has eCommerce enabled (see Set Up Online Booking, step 4).
3. Embed on your platform
Section titled “3. Embed on your platform”Choose the instructions for your website platform below.
WordPress (Custom HTML block)
Section titled “WordPress (Custom HTML block)”- Open the page or post where you want the booking widget in the WordPress Block Editor (Gutenberg).
- Click the + button to add a new block.
- Search for Custom HTML and select it.
- Paste the embed code you copied in step 1.
- Click Preview in the block toolbar to verify it renders.
- Click Update (or Publish) to save the page.
WordPress Classic Editor: Switch to the Text tab (not Visual) and paste the code there.
Wix (Embed HTML widget)
Section titled “Wix (Embed HTML widget)”- Open the page in the Wix Editor.
- Click Add Elements (+) in the left panel.
- Go to Embed Code > Embed HTML.
- Drag the widget onto the page where you want the booking catalog.
- In the HTML settings panel, click Enter Code, paste the embed code, and click Update.
- Resize the widget frame to fit your layout (recommended: full page width, 700-900 px height).
- Click Publish to save.
Wix note: Wix sandboxes embedded HTML in its own iframe. The widget will still work, but the double-iframe can cause scrollbar issues. If scrolling feels awkward, set a fixed height (see step 4 below).
Squarespace (Code block)
Section titled “Squarespace (Code block)”- Open the page in the Squarespace Editor.
- Click Edit on the section where you want the widget.
- Click Add Block > Code.
- Paste the embed code into the code block. Make sure the display toggle is set to HTML (not Markdown).
- Click Apply, then Save the page.
Squarespace note: Code blocks are only available on Business and Commerce plans.
4. Adjust responsive sizing
Section titled “4. Adjust responsive sizing”The default embed code uses padding-top: 56.25% (16:9 ratio), which works well for wide layouts. Depending on your page design, you may need to adjust it.
Option A — Fixed height (recommended for most sites):
Replace the padding-top line in the <style> block with a fixed height:
.bloowatch-booking-wrapper { position: relative; overflow: hidden; width: 100%; height: 800px; /* adjust to your preference */}Option B — Taller ratio for narrow layouts:
If the widget feels cramped, increase the padding:
padding-top: 75%; /* 4:3 ratio -- taller */Option C — Full viewport height:
.bloowatch-booking-wrapper { width: 100%; height: 100vh;}Tip: Open your page on a phone and a tablet to verify the widget looks right at different screen widths.
5. Test the full booking flow
Section titled “5. Test the full booking flow”- Open the page with the embedded widget in an incognito/private window (to avoid cached sessions).
- Browse the catalog and click BOOK on a product.
- Select a session date and group size.
- Complete checkout (use a test payment method if possible).
- Verify the booking appears in Sales > Bookings with origin WEB.
What should happen next
Section titled “What should happen next”- The booking widget loads on your website and shows your enabled products with images, prices, and available sessions
- Customers can browse, select dates, and pay without leaving your site
- Each online booking appears in Sales > Bookings with origin WEB
- You receive a notification for each new online booking
Common issues
Section titled “Common issues”| Issue | Why it happens | Fix |
|---|---|---|
| Widget is completely blank | No products have eCommerce enabled, or the booking URL is wrong | Check that at least one product is enabled in Resources > Products > eCommerce tab. Verify the iframe src URL is correct. |
| Widget loads but shows “no availability” | No sessions exist on the Agenda for future dates | Add sessions to the Agenda (manually or with recurrence rules) |
| Cross-origin / mixed content errors in browser console | Your website uses HTTPS but the iframe src uses HTTP (or vice versa) | Make sure the iframe src starts with https://. Bloowatch always uses HTTPS. |
| Widget doesn’t scroll properly (Wix) | Wix wraps embeds in an extra iframe, causing nested scrollbar issues | Set a fixed height on the embed wrapper (e.g., height: 800px) instead of using the responsive padding technique |
| Widget is cut off at the bottom | The responsive wrapper height is too short for the content | Increase padding-top or switch to a fixed height (e.g., height: 900px) |
| Embed looks broken on mobile | The CSS wrapper doesn’t fit the mobile viewport | Test with a fixed height and width: 100%; remove padding-top if it causes layout issues |
| ”Refused to display in a frame” error | Your site or a browser extension blocks iframes | Check your site’s Content Security Policy headers. Disable ad-blockers temporarily. |
| Booking form doesn’t submit / payment fails | Payment gateway not configured | Check Settings > Payments and verify your Stripe integration is active |
If it still doesn’t work
Section titled “If it still doesn’t work”- Open the booking URL directly in a browser (
https://your-school.bloowatch.com/booking) — if it works there, the issue is in your website’s embed setup - Check the browser developer console (F12 > Console) for error messages
- Try the embed code on a blank test page to isolate the issue
- Clear your browser cache and try in an incognito window
- Contact Bloowatch Support via the chat widget
